PHP/Apache running on Linux won’t connect to a PostgreSQL server

SELinux will block PHP/Apache from connecting to PostgreSQL (and probably any other DB) by default on some Linux distributions. If you are trying to get PHP to connect to a PostreSQL DB on a linux box for the first time and you are sure your pg_hba.conf on the target box is setup correctly then try this:

setsebool -P httpd_can_network_connect 1

This should configure SELinux to allow Apache/PHP to connect to other hosts.

National Broadband Map Review

The National Telecommunications and Information Administration (NTIA) in collaboration with the FCC has published a series of broadband maps on a new site called National Broadband Map (NBM). These maps show what broadband services are available throughout the United States as well as other interesting broadband data.
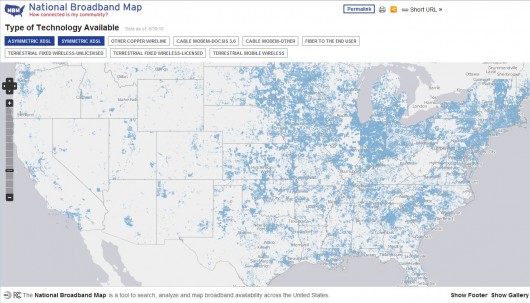
national broadband map screenshot

Hit this link and click the “Explorer the Map” option on their main page to see a map of the US with shaded areas where selected broadband services are available. You can click different selections above the map to toggle the various broadband technologies. To see other maps such as advertised versus actual broadband speeds click on the “Show Gallery” option in the lower right hand corner.

Rochester, NY does pretty well on advertised versus actual although there a few slower than advertised points here and there. Upload performance data is also available. Usually the cable and DSL providers don’t brag much about upload performance likely because in most cases it is lousy compared to download performance. I think upload performance will become more important to the typical internet user than it as in the past now that people are sharing their pictures and video online.

The NBM site use a variety of open source technologies including:

  • JQuery – My favorite JavaScript library.
  • Modernizr – A JavaScript library to detect browser capabilities.
  • OpenLayers – Provides a JavaScript API to display WFS and WMS GIS layers.
  • GeoServer – A Java based server software that provides WFS and WMS services.

What is particularly interesting about the site is the developer resources. They provide a series of API’s you can call from your own web applications to use their data. Output formats include XML, JSON, and JSONP implementations. If you want to use the data locally without the APIs you can download it.

I do have a couple criticisms regarding the maps and ironically, they are bandwidth related. The first is that there are too many tiles returned when viewing the default map of the US. I noticed the map was a little slow to fill in. When I enabled Firebug and clicked on the “Explore the Map” option off the main page, over 500 tiles were pulled down. In fact, Firefox/Firebug became unresponsive. I would expect less than 30 256×256 tiles need to be pulled down for a reasonably sized browser window. I wager there is something goofy going on like a bounding box not set for the area displayed.

My second criticism is that the site is not using gzip to compress JavaScript files. Modern web applications tend to lay on the JavaScript pretty heavy and this one is no exception. OpenLayers.js is nearly 1MB all by itself. By enabling gzip on sites with large JavaScript files you can significantly improve site performance. This is a good topic for a future post.

Overall I think the National Broadband Map Site is an excellent resource. It provides very useful data on broadband technologies/speeds, makes this data available via APIs or download, and also demonstrates a variety of open source web application technologies.

Is it worth the $20 million that contractors were paid to build the map? I would say certainly not at first glance but I would want to hear the whole story before I jump to conclusions. I.e. how much of that $20 million was spent on actual development? I am much more skeptical of the alleged $293 million required to collect the data.

MsMpEng.exe – Microsoft Security Essentials high CPU Utilization

If you are running Microsoft Security Essentials with real-time protection enabled on a machine running ThinkVantage Access Connections you might notice the MsMpEng.exe service consuming most of your CPU time. This will cause your Lenevo laptop to run obnoxiously slow. Allegedly this issue was fixed with a new version of Access Connections but on a laptop I was working on the problem persisted even after I updated Access Connections.

If logging is enabled in Access Connections the “AccConnAdvanced.html” file will continuously be updated. Microsoft Security Essentials appears to then scan this file over and over again after each change. This is probably causing the processor to burn your precious battery life away. This way Lenovo can sell more battery pack upgrades. 😉

There are two ways to fix this: Add an exception to Microsoft Security Essentials or disable logging in Access Connections.

If you want to continue logging Access Connection activity you can add an exclusion in Microsoft Security Essentials:

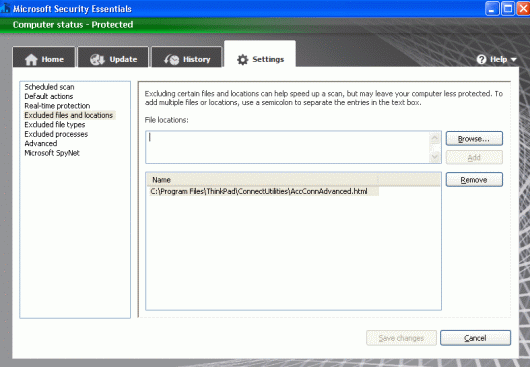
  1. Open up Microsoft Security Essentials and click on the “Settings” tab.
  2. Select “Excluded files and locations”.
  3. Click the “Browse…” button and select the “AccConnAdvanced.html” which, should be under “C:\Program Files\ThinkPad\ConnectUtilities\” by default. Click “OK”.
  4. Click “Add” and then “Save changes”. MsMpEng.exe CPU utilization should then drop to around 0%.

add microsoft security essentials exclusion

Here is how you can disable logging in Access Connections (at least on Windows XP).

  1. Launch Access Connections: “Start”->”Programs”->”ThinkVantage”->”Access Connections”.
  2. Once Access Connections is up switch the view to “Advanced” by clicking the “Advanced” button in the upper right hand corner.
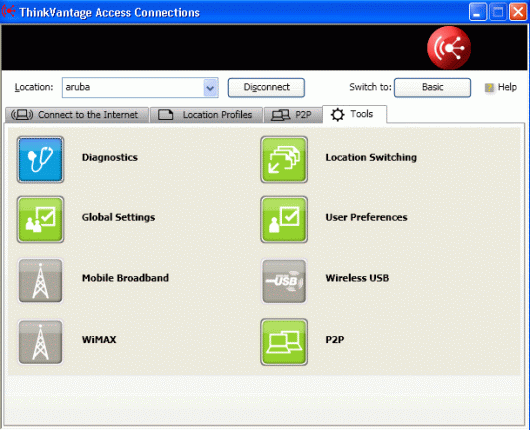
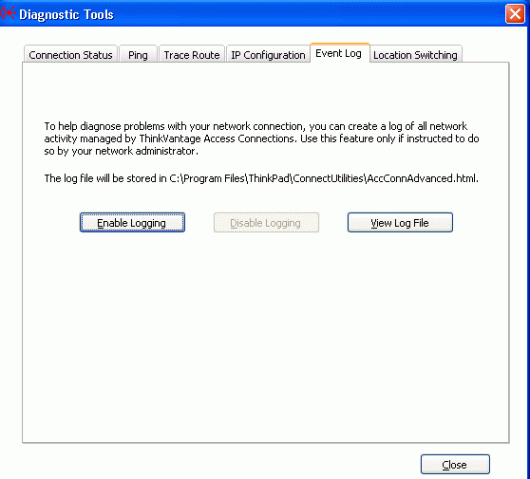
  3. Click the “Tools” tab and then “Diagnostics” and then the “Event Log” tab on the Diagnostics Tools screen.
  4. Click “Disable Logging” and then click “Close”. The AccConnAdvanced.html file should no longer grow and MsMpEng.exe CPU utilization should drop to nearly 0%.

access connections tools

Titanium Appcelerator Quirks (Updated)

I recently started tinkering with the Appcelerator Titanium Development Platform and have run into a couple quirks.

Web Inspector will not Launch

If you create a Titanium project on any drive other than C:\ on a Windows system, you will not be able to launch the Web Inspector. This is a apparently a known bug in Titanium Developer.

Conflicting PHP Installations

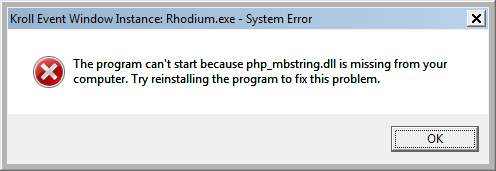
If you attempt to launch a Titanium Appcelerator PHP app in Titanium Developer on a Windows system that already has a local PHP installation, you may see the following error:

Kroll Event Window Instance: YourApp.exe – System Error

The program can’t start because php_mbstring.dll is missing from your computer. Try reinstalling the program to fix this problem.

Titanium Appcelerator php_mbstring.dll error

Don’t bother re-installing anything. What is likely happening is that your pre-existing PHP installation added a “PHPRC” environment variable that points to your existing PHP install folder. I think Titanium’s command line PHP instance sees this variable and then attempts to use the php.ini file in that path. Your existing PHP installation folder does not likely have the PHP settings and/or module paths that Titanium needs so it breaks.

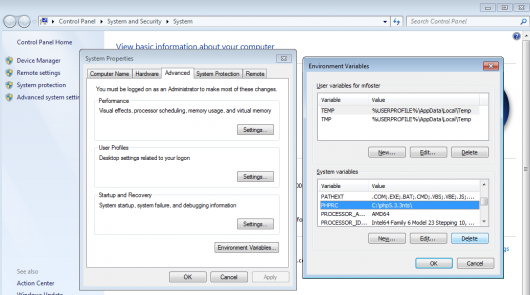
To fix this without renaming your current PHP installation folder you can delete the “PHPRC” environment variable. Your existing PHP installation should work fine without it because PHP will look for the php.ini file in the same folder it is running from. To delete the “PHPRC” environment variable on Windows 7, click Windows Start, right click “Computer”, left click “Properties” -> “Advanced system settings” -> “Environment Variables…” -> select “PHPRC” under “System variables”, and then click “Delete”.

how to delete the phprc environment variable

Hopefully you can now launch your Titanium application without an error and your existing PHP installation will continue to work normally.

Limited screen resolutions running CentOS as a VirtualBox guest

If you are attempting to run a newer version of CentOS as a guest on VirtualBox you need to install the “Guest Additions” on your CentOS VM to enable higher display resolutions. If you don’t, 800×600 and 640×480 will probably be your only options.

This is in the manual of course but if you were in a bit of rush like myself you may have missed that part. 😉 Once you complete the “Guest Addition” installation process the CentOS guest desktop will dynamically re-size to match your view-port. Installing the Guest Addition will add some other handy features including a shared clipboard and shared folders.

If you are running an older CentOS guest you may have to manually add additional resolutions to the xorg.conf file.